准备安装包
前期准备工作下载相关的rpm包

首先去Oracle官网下载19c的rpm安装包下载链接,也可以用命令下载:

 https://www.oracle.com/database/technologies/oracle19c-linux-downloads.html

下载完成之后再去下载另一个依赖包oracle-database-preinstall-19c-1.0-1.el7.x86_64.rpm

 https://yum.oracle.com/repo/OracleLinux/OL7/latest/x86_64/index.html

进入页面按ctrl+F搜索preinstall-19c找到名字为

一定找一台全新的服务器安装,不然会出现各种问题
关闭防火墙
首先防火墙是一定要一定要关闭的哦
#systemctl stop firewalld.service
关闭操作系统自启动
#systemctl disable firewalld.service
检查关闭情况
systemctl status firewalld.service
如下,dead表示未开启开机启动;inactive表示现在的状态是关闭

[root@DBServer1 ~]# vi /etc/selinux/config
# This file controls the state of SELinux on the system.
# SELINUX= can take one of these three values:
#       enforcing - SELinux security policy is enforced.
#       permissive - SELinux prints warnings instead of enforcing.
#       disabled - SELinux is fully disabled.
SELINUX=disabled
# SELINUXTYPE= type of policy in use. Possible values are:
#       targeted - Only targeted network daemons are protected.
#       strict - Full SELinux protection.
SELINUXTYPE=targeted
安装依赖包
大部分依赖包已经集成在之前我们下载的rpm包里面,但一下依赖包仍然需要我们安装
yum install libstdc++-devel compat-libstdc++-33 ksh glibc-devel libaio-devel compat-libcap1
下载并安装预安装包
# 下载
curl -o oracle-database-preinstall-19c-1.0-1.el7.x86_64.rpm https://yum.oracle.com/repo/OracleLinux/OL7/latest/x86_64/getPackage/oracle-database-preinstall-19c-1.0-1.el7.x86_64.rpm

##安装
yum -y localinstall oracle-database-preinstall-19c-1.0-1.el7.x86_64.rpm
配置环境变量
su – oracle
vi ~/.bash_profile
export ORACLE_BASE=/opt/oracle
export ORACLE_HOME=/opt/oracle/product/19c/dbhome_1
export PATH=$ORACLE_HOME/bin:$PATH
# 此处Oracle默认是ORCLCDB,我改为了ORCL
export ORACLE_SID=ORCLCDB
安装Oracle软件
# 把oracle-database-ee-19c-1.0-1.x86_64.rpm上传到服务器上,我上传到了/home/oracle目录下
cd /home/oracle
# 执行过程比较长
yum -y localinstall oracle-database-ee-19c-1.0-1.x86_64.rpm
更改配置
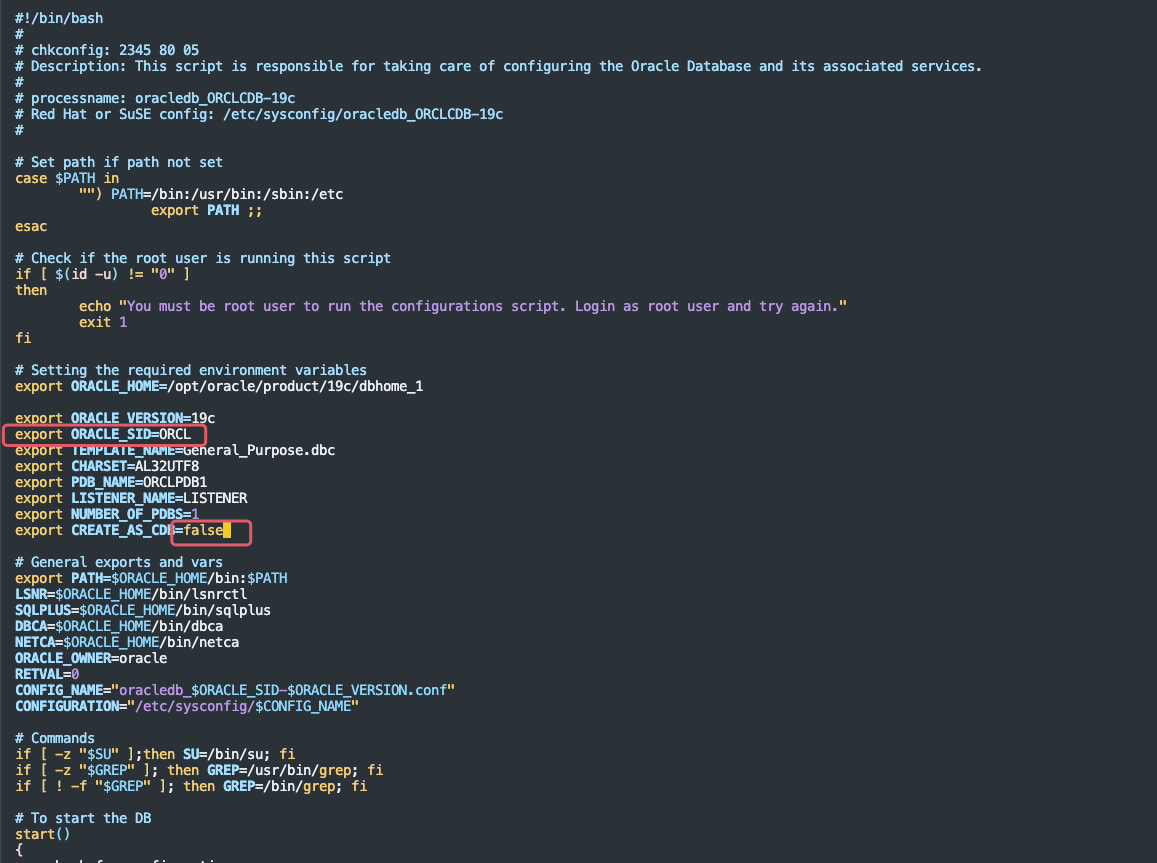
vim /etc/init.d/oracledb_ORCLCDB-19c configure
1、SID我改为了ORCL
2、CREATE_AS_CDB改为false,这是问你要不要创建容器化数据库,如果是true以后创建的用户好像是都要加c##,所有我就设为false了然后保存退出

初始化配置
# 因为改了SID,所以重新复制一个跟SID同名的出来
cp /etc/init.d/oracledb_ORCLCDB-19c /etc/init.d/oracledb_ORCL-19c
cp /etc/sysconfig/oracledb_ORCLCDB-19c.conf /etc/sysconfig/oracledb_ORCL-19c.conf

# 初始化
/etc/init.d/oracledb_ORCL-19c configure
数据库配置
vim ~/.bash_profile

export ORACLE_BASE=/opt/oracle
export ORACLE_HOME=/opt/oracle/product/19c/dbhome_1
export ORACLE_SID=ORCLCDB
export PATH=$ORACLE_HOME/bin:$PATH:$HOME/.local/bin:$HOME/bin
export NLS_LANG=CHINESE_CHINA.AL32UTF8

# 你没看错 先到oracle里再执行source
su oracle
source ~/.bash_profile
sqlplus / as sysdba
问题处理
Oracle dbca dbt-05509报错问题
在bclinux系统安装Oracle数据库,执行dbca创建数据库时报错,DBT-05509 failed to connect to the specified database(xxx).
解决办法:
vi /home/oracle/.bash_profile添加或修改
export NLS_LANG=“AMERICAN_AMERICA.AL32UTF8”
ORA-12705:无法访问NLS数据文件或者指定的环境无效
查看各处的字符集是否一致
口令修改
一、安装完后的修改口令:
1、先登录服务器后,切换到oracle用户状态下: su oracle
2、进入sqlplus,命令: sqlplus /nolog
3、管理员 sysdba 权限登陆oracle: conn as sysdba
4、修改密码:
法1.SQL> alter user sys identified by huozhe
法2.SQL> grant connect to sys identified by 123456
法3. SQL> password system
更改 system 的口令
新口令:
重新键入新口令:
口令已更改
(注:法3只适用于SYSTEM)


评论区